To Create A Network Topology on Azure
All of the cloud solutions are related to networks. As a Network Engineer, I could not stay away from these solutions. As you know there is a few cloud solution
1- Azure Cloud
2- AWS Cloud
3- Google Cloud
4- IBM Cloud
5- Oracle Cloud
6- Linux Cloud
And also a few of these solutions are giving free accounts to learn and make a lab. I could not miss this opportunity. I had tried the AWS cloud solution earlier with a free account. Azure is recently one of the most popular cloud solutions. In terms of network, Azure free account presents more free service than AWS cloud solution. I warm to Azure now.
I have created a lab topology to better understand the Azure network components. This topology is below.

I have a Virtual Network Gateway, firewall, and two pc on a different subnet at the related this topology, That's all.
First to create this topology respectively.
1-Create Resource Group
2- Create Virtual Network
3- Create Subnet in Virtual Network
a- Frontend
b- Backend
c- GatewaySubnet(define like this))
d- AzureFirewallSubnet(define like this)
4- Create Virtual Machine
5- Create Virtual Network Gateway
6- Configure Virtual Network Gateway for Client VPN access
7- Create Firewall
8- Create Route Table
9- Create a default route
1-Create Resource Group;
A resource group is a container that holds related resources for an Azure solution. The resource group can include all the resources for the solution, or only those resources that you want to manage as a group.
2- Create Virtual Network;
Azure Virtual Network (VNet) is the fundamental building block for your private network in Azure.VNet enables many types of Azure resources, such as Azure Virtual Machines (VM), to securely communicate with each other, the internet, and on-premises networks. VNet is similar to a traditional network that you'd operate in your data center but brings with it additional benefits of Azure's infrastructure such as scale, availability, and isolation.
3- Create Subnet in Virtual Network;
It is no different from creating a normal subnet.
4- Create Virtual Machine;
I could not able to create a free virtual machine in My virtual network. Instead of this, I will create Linux virtual machine with a monthly fee of 6,4$.
I have created the first virtual machine in FrontEnd Subnet. By following the same process I will create a second virtual machine in the BackEnd subnet.
Here are my virtual machines
5- Create Virtual Network Gateway;
A VPN gateway is a specific type of virtual network gateway that is used to send encrypted traffic between an Azure virtual network and an on-premises location over the public Internet. You can also use a VPN gateway to send encrypted traffic between Azure virtual networks over the Microsoft network. Each virtual network can have only one VPN gateway. However, you can create multiple connections to the same VPN gateway. When you create multiple connections to the same VPN gateway, all VPN tunnels share the available gateway bandwidth.
Vpn type limitation;

I am using Basic mode. I do not need BGP and Zone redundant now.
Virtual Network Gateway is ready.

6- Configure Virtual Network Gateway;
I can access my virtual machines over the gateway with a VPN client. The latest state of the topology is as follows.

I have to create a certificate for client access. If you do not have any CA (certification authority), You can generate the self-sign certificate on Windows or Linux machine.
- Run powershell
- Generate root certificate
$cert = New-SelfSignedCertificate -Type Custom -KeySpec Signature -Subject "CN=NETWORKTCPIP" -KeyExportPolicy Exportable -HashAlgorithm sha256 -KeyLength 2048 -CertStoreLocation "Cert:\CurrentUser\My" -KeyUsageProperty Sign -KeyUsage CertSign
Also, you can use the certificate at the different clients, you have to create .pfx extension to install the different clients which access to Azure environment. it is necessary.
New-SelfSignedCertificate -Type Custom -DnsName NETWORKTCPIPCLIENT -KeySpec Signature -Subject "CN=NETWORKTCPCLIENT" -KeyExportPolicy Exportable -HashAlgorithm sha256 -KeyLength 2048 -CertStoreLocation "Cert:\CurrentUser\My" -Signer $cert -TextExtension @("2.5.29.37={text}1.3.6.1.5.5.7.3.2")
See the certificates which you created

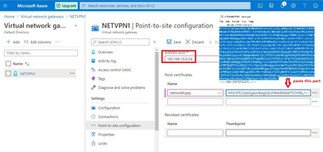
I will upload the root certificate which is created to the Azure VPN network gateway.
If you followed the process, accessing the lab environment with a VPN client will be ready.
As you see, the ping result is from my private IP to Azure private IP.

We can connect now. Azure suggests a Vpn gateway to connect to our environment. But if you want to open some port (ssh, web, etc..) to the internet, that is at the time you have to install a firewall.
Also, we can use the following features with a VPN network gateway.
- Vnet-to-Vnet connection
- Site-to-Site Vpn
- ExpressRoute
7- Create Firewall;
Everything is okay to create a firewall.
8- Route Table;
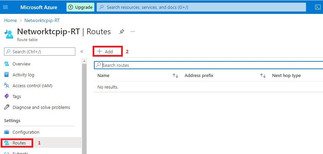
Azure automatically creates a route table for each subnet within an Azure virtual network and adds system default routes to the table. You can override some of Azure's system routes with custom routes, and add additional custom routes to route tables. Azure routes outbound traffic from a subnet based on the routes in a subnet's route table.
9- Create Default Route;
I have prepared the topology which you see at the top of the article. Now I will write a few rules open ssh port to access the virtual machines over the internet.
After I have written the rules, I can connect to my PC's private IP address from the firewall's public IP over the internet.


Thanks for Reading.
Reference Site: https://docs.microsoft.com/


Comments